Showing posts with label OSX. Show all posts

Sunday, March 8, 2015

[OSX] Upgrade Mavericks to Yosemite the hard way


Intro

Quite a long time that I didn't upgrade my PC hardware (before 2012 I think), And last time I just upgrade OSX to Maverick but suddenly Xcode required to use Yosemite...grhhh So I've 2 task to accomplish here,

  1. upgrade my Maverick to Yosemite for Xcode sake.
  2. upgrade my hardware which is EVGA GTS250 PCIExpressx16 Gen 2 1G GDDR3 to ASUS GeForce® GTX 750 Ti OC 2G (which is same price at that time but yeah faster obviously)

Due to many step and Boot Flags to miss and mess up and yes I did lost a whole day and night to finish it! Then it a good reason to write it here for my own use later and should be save save someone time! Let's go!

My PC System

  • Model Identifier: MacPro3,1
  • Processor Name: Intel Core i5
  • Processor Speed: 3.21 GHz
  • Number of Processors: 1
  • Total Number of Cores: 2
  • L2 Cache (per Core): 256 KB
  • L3 Cache: 4 MB
  • Memory: 12 GB
  • Boot ROM Version: MultiBeast.tonymacx86.com
  • SMC Version (system): 1.30f3
  • Graphics: ASUS GeForce® GTX 750 Ti OC 2G *My new baby yeah!

Prerequisite

Problem #1

Stuck at [IOBluetoothHCIController][SearchForTransportEventTimeOutHandler] -- Missing Bluetooth Controller Transport!

Solution #1

  • It's not a bluetooth problem at all, actually it's a process after that which is graphic related so don't bother fix bluetooth. do try (-v is for trace purpose, no effect)
    -v -x
    or
    -v -x GraphicsEnabler=Yes nv_disable=1

Problem #2

nv_disable=1 did boot and getting in OSX but got glitch+slow render 

Solution #2

Problem #3

Try login Mac App Store but get... 
  • "Your device or computer could not be verified. Contact support for assistance." 

Solution #3

Problem #4

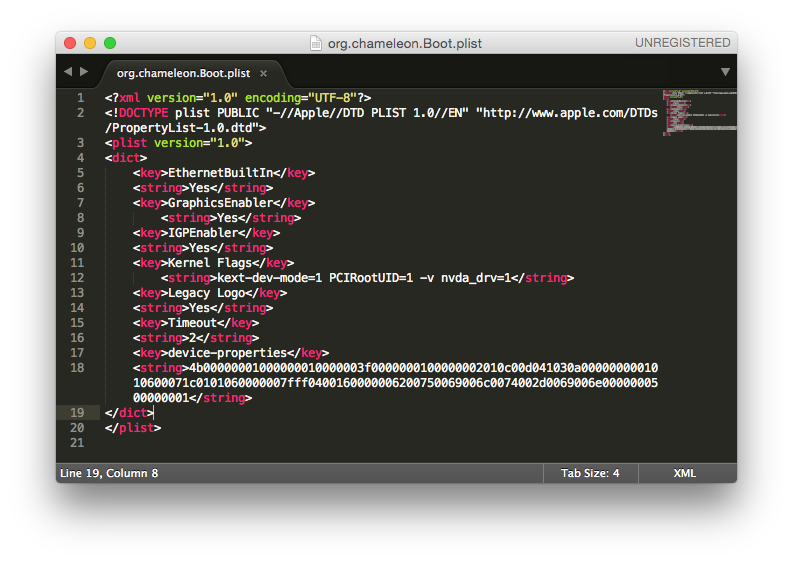
boot flags keep getting nvda_drv=1 like this

Solution #4

  • #to see it's there
  • $ nvram -p
  • #to delete it (sudo did the trick for me)
  • $ sudo nvram -d boot-args

Hint!

Tuesday, May 20, 2014

[OSX] How to boot Maverick on PC


[image credit tonymacx86.com]

It's about time to update my OS X via my PC in case Maverick 10.9.3 is out and I just finish my first Xcode app so I have no fear to lost my all installation (worst case) after major update in case I already backup my certificate and push all stuff to git :)

Note to self

  1. just follow : http://www.tonymacx86.com/374-unibeast-install-os-x-mavericks-any-supported-intel-based-pc.html
  2. refer to this, my GTS250 will need default setting + GraphicsEnabler=Yes
  3. and maybe http://www.osx86.net/files/download/3123-geforce-gts-250-evga-xfx-etc/
  4. and my sound still need : http://www.tonymacx86.com/audio/63663-asus-p7p55d-enable-via-vt1828s-sound-10-8-a.html
  5. my second monitor via HDMI not seem to work like expected so I fallback to VGA and it just work so I can live with it.
  6. I realize that when freezing at spinning loading screen i will need to turn PC off not just hit reset button, same rule apply to BIOS setting which seem to be not save after freeze even I hit save button, weird but workaround is easy enough tho ;)
It's not kinda hard this time because I install over my old 10.8.5 and seem like it take all setting and configuration form old stuff so I'm happy now. yeah! 

Happy Xcoding! ;)

Sunday, November 11, 2012

[Xcode] Summon UniBeast on PC for Xcode


I'll post my journey through Mac via PC here, you can expected more update later ;)

What's PC spec?

I install to my good old PC instead of buying new one (yes i'm poor) which is...
  • ASUS P7P55D PRO Intel P55 Express Chipset Mainboard for Intel LGA 1156
  • Intel Core i5-650 3.2 GHz  [LGA 1156]
  • G.SKILL F3-12800CL9T NQ Series 3GB (3x 1GB) DDR3-1600 240-Pin CL9 RAM
  • EVGA GTS250 PCIExpressx16 Gen 2 1G GDDR3 // old card but still fast enough
  • ST3750330AS 750MB // yes, old HD perfect for testing ;)
  • LG E2360 - DVI
  • LG W2261- HDMI // won't work, freeze when plug it in ;(

How?

  1. Try install UniBeast : http://www.tonymacx86.com/61-unibeast-install-os-x-mountain-lion-any-supported-intel-based-pc.html // super geek installation, you can break your computer in every step, but when it's done it's just working like Mac
  2. If it not work, try EasyBeast only and don't install any driver yet. // i've have to use this method with out UserDSDT and only EasyBeast checked and reboot then try add lnx2mac's realtek rtl81xx ethernet later.

Any suggestion?

  1. Unplug as any USB possible.
  2. Unplug any HD as possible.
  3. My audio need this fix : http://www.tonymacx86.com/audio/63663-asus-p7p55d-enable-via-vt1828s-sound-10-8-a.html
  4. after switching from IDE to AHCI you need to reboot it twice to let bios scan hard disk all over again and also make sure boot drive is set.

Tune your Mac like PC

  1. make Mac keyboard behavior as PC : http://doublecommand.sourceforge.net
  2. invert scroll wheel in your setting // mouse rules!
  3. remap Windows key (Command key) to CTRL key and you can copy/paste like before.
  4. remap Home End behaviour like Windows : http://www.starryhope.com/mac-os-x-home-and-end-keys/
  5. to switch language with grave accent : https://pqrs.org/macosx/keyremap4macbook/
  6. stupid copy/paste merge...try alt while drag/drop or ForkLift
  7. to batch like DOS (foo.bat) in Mac is create file "foo.sh" begin with "#!/bin/bash" follow with your cmd e.g. echo "Hello World!" it will look like...

    #!/bin/bash
    echo "Hello World"

    save and then "chmod u+x foo.sh" and run it with "sh foo.sh" // easier in Windows!
  8. view all hidden file open terminal and...
    
    defaults write com.apple.Finder AppleShowAllFiles YES
    
    then alt+right click at Finder then select Relaunch 

Pro?

  1. cheaper than buy new Mac. // poor me
  2. faster than VMWare. // bye bye VMWare

Cons?

  1. Dual monitor HDMI will freeze. // something todo with my GTS250 driver...
  2. You Windows 7 MBR can be broken after try switching where to boot between OS. // i did have to reinstall Windows 7 ;p
Now install XCODE and  have fun developing! :)